Welcome to this simple guide on how to change the skin (exterior parts of a vehicle in Farming Simulator 25) and the interior cabin (or driver cabin, as some prefer to call it) of a vehicle.
To guide you through these steps, you’ll need some tools to modify and edit the XML and i3D files for a vehicle featured in Farming Simulator 25. We will use the latest version of GIANTS Editor and a freeware software called Notepad Plus.
- Download GIANTS Editor *requires a user account at GDN Giants Developer Network*
- Download NotePad Plus *no signup requirement*
How do we use these tools?
We will only use GIANTS Editor as a viewing tool without saving the file. Reskinning will take place in NotePad Plus to modify the XML file itself. XML files contain valuable information or data related to the vehicle. The i3D is like an XML file itself, while the visual graphics are written and stored in a SHAPE file (.shapes).
First and foremost, please install the GIANTS Editor and make sure it runs on your system.
Step 1 – Vehicle.i3D File
1.1 – Run Windows File Explorer ( for Windows 10-11, hit the Windows key + E on your keyboard.)
1.2 – Navigate to your Steam Library folder or the main game folder of FS25. For Steam, it can be SteamLibrary -steamapps-common-Farming Simulator 25.
1.3 – Open up this folder and look for a folder named data.
1.4 – Continue navigating to the following folder named vehicles.
1.5 – Open up this folder and navigate to caseIH.
1.6. – Continue navigate to the following folder named quadtrac715.
1.7 – Open up this folder and look for a file named quadtrac715.i3d
1.8 – IMPORTANT- Copy and paste this file to a safe location outside of your game’s main folder, such as MyDocuments.

1.9 Right-click this file quadtrac715.i3d and select Open up with… or Edit with… NotePad Plus.
Once you see the content of this file in NotePad Plus, it will look a bit overwhelming for sure. But we are just going to make some changes to the materials.

Step 2 – Material Data Editing
2.1 – Scroll down to line 89 where it says:
<Material name="lambert1" materialId="1" diffuseColor="0.5 0.5 0.5 1">
    </Material>
2.2 – Change the value of the diffuseColor to 0.018 0.017 0.017 with spaces between.
2.3 – Scroll down to the next line, line 101, where it says:
<Material name="quadtrac715Alpha_CASEIH_RED1_mat" materialId="56" customShaderId="13" customShaderVariation="vmaskUV2">
      <CustomParameter name="clearCoatIntensity" value="0.1000"/>
      <CustomParameter name="clearCoatSmoothness" value="0.2000"/>
      <CustomParameter name="colorScale" value="0.3909 0.0000 0.0000"/>
      <CustomParameter name="smoothnessScale" value="0.8500"/>
      <Custommap name="detailDiffuse" fileId="14"/>
      <Custommap name="detailNormal" fileId="15"/>
      <Custommap name="detailSpecular" fileId="16"/>
      <Texture fileId="10"/>
      <Normalmap fileId="11"/>
      <Glossmap fileId="12"/>
    </Material>
2.4 Change the value of colorScale to 0.018 0.017 0.017 with spaces between. Notice that the Material name says ‘Alpha_’
2.5 Scroll down to the following line, line 156, where it says:
 <Material name="quadtrac715_CASEIH_RED1_mat" materialId="43" customShaderId="13">
      <CustomParameter name="clearCoatIntensity" value="0.1000"/>
      <CustomParameter name="clearCoatSmoothness" value="0.2000"/>
      <CustomParameter name="colorScale" value="0.3909 0.0000 0.0000"/>
      <CustomParameter name="smoothnessScale" value="0.8500"/>
      <Custommap name="detailDiffuse" fileId="14"/>
      <Custommap name="detailNormal" fileId="15"/>
      <Custommap name="detailSpecular" fileId="16"/>
      <Texture fileId="20"/>
      <Normalmap fileId="21"/>
      <Glossmap fileId="22"/>
    </Material>
2.6 Change the value of colorScale to 0.018 0.017 0.017—also with spaces. These values are RGB values, defining the amount of Red, Green, and Blue in a color.
You probably noticed that I’m replacing these values with 0.018, 0.017, and 0.017 each time. Later, you’ll see why.
2.7 Scroll down to the next line, line 204 where it says:
<Material name="quadtrac715_CASEIH_RED2_mat" materialId="15" customShaderId="13">
      <CustomParameter name="clearCoatIntensity" value="0.5000"/>
      <CustomParameter name="clearCoatSmoothness" value="0.8500"/>
      <CustomParameter name="colorScale" value="0.4147 0.0000 0.0077"/>
      <CustomParameter name="smoothnessScale" value="0.4157"/>
      <Custommap name="detailDiffuse" fileId="31"/>
      <Custommap name="detailNormal" fileId="32"/>
      <Custommap name="detailSpecular" fileId="33"/>
      <Texture fileId="20"/>
      <Normalmap fileId="21"/>
      <Glossmap fileId="22"/>
    </Material>
2.8 Change the value of colorScale to 0.018 0.017 0.017.
2.9 Continue scrolling down to line 304 where it says:
<Material name="quadtrac715_leather1_CASEIH_RED1_01_mat" materialId="20" customShaderId="13">
      <CustomParameter name="colorScale" value="0.3909 0 0"/>
      <Custommap name="detailDiffuse" fileId="44"/>
      <Custommap name="detailNormal" fileId="45"/>
      <Custommap name="detailSpecular" fileId="46"/>
      <Texture fileId="20"/>
      <Normalmap fileId="21"/>
      <Glossmap fileId="22"/>
    </Material>
2.10 Change the value of colorScale to 0.018 0.017 0.017.
2.11 Scroll down to line 358 where it says:
<Material name="quadtrac715_leather2_mat" materialId="31" customShaderId="13">
      <CustomParameter name="colorScale" value="0.01 0.01 0.01"/>
      <Custommap name="detailDiffuse" fileId="52"/>
      <Custommap name="detailNormal" fileId="53"/>
      <Custommap name="detailSpecular" fileId="54"/>
      <Texture fileId="20"/>
      <Normalmap fileId="21"/>
      <Glossmap fileId="22"/>
    </Material>
2.12 Change the value of colorScale to 0.018 0.017 0.017.
2.13 Continue scrolling down to line 376 where it says:
<Material name="quadtrac715_leather1_CASEIH_RED1_02_mat" materialId="37" customShaderId="13">
      <CustomParameter name="colorScale" value="0.3909 0 0"/>
      <Custommap name="detailDiffuse" fileId="44"/>
      <Custommap name="detailNormal" fileId="45"/>
      <Custommap name="detailSpecular" fileId="46"/>
      <Texture fileId="20"/>
      <Normalmap fileId="21"/>
      <Glossmap fileId="22"/>
    </Material>
2.14 Change the value of colorScale to 0.018 0.017 0.017.
2.15 Scroll down to line 447 where it says:
 <Material name="quadtrac715GridB_CASEIH_RED1_mat" materialId="57" customShaderId="13" customShaderVariation="vmaskUV2">
      <CustomParameter name="clearCoatIntensity" value="0.1000"/>
      <CustomParameter name="clearCoatSmoothness" value="0.2000"/>
      <CustomParameter name="colorScale" value="0.3909 0.0000 0.0000"/>
      <CustomParameter name="smoothnessScale" value="0.8500"/>
      <Custommap name="detailDiffuse" fileId="14"/>
      <Custommap name="detailNormal" fileId="15"/>
      <Custommap name="detailSpecular" fileId="16"/>
      <Texture fileId="59"/>
      <Normalmap fileId="60"/>
      <Glossmap fileId="58"/>
    </Material>
2.16 Change the value of colorScale to 0.018 0.017 0.017.
2.17 Scroll down to line 459, where it says:
<Material name="quadtrac715Grid_CASEIH_RED1_mat" materialId="58" customShaderId="13" customShaderVariation="vmaskUV2">
      <CustomParameter name="clearCoatIntensity" value="0.1000"/>
      <CustomParameter name="clearCoatSmoothness" value="0.2000"/>
      <CustomParameter name="colorScale" value="0.3909 0.0000 0.0000"/>
      <CustomParameter name="smoothnessScale" value="0.8500"/>
      <Custommap name="detailDiffuse" fileId="14"/>
      <Custommap name="detailNormal" fileId="15"/>
      <Custommap name="detailSpecular" fileId="16"/>
      <Texture fileId="56"/>
      <Normalmap fileId="57"/>
      <Glossmap fileId="58"/>
    </Material>
2.18 Change the value of colorScale to 0.018 0.017 0.017.
2.19 Scroll down to line 637, where it says:
<Material name="quadtrac715_calibratedGlossPaint_CASEIH_RED1_mat" materialId="12" customShaderId="13">
      <CustomParameter name="clearCoatIntensity" value="0.5000"/>
      <CustomParameter name="clearCoatSmoothness" value="0.8500"/>
      <CustomParameter name="colorScale" value="0.3909 0 0"/>
      <CustomParameter name="smoothnessScale" value="0.8500"/>
      <Custommap name="detailDiffuse" fileId="14"/>
      <Custommap name="detailNormal" fileId="15"/>
      <Custommap name="detailSpecular" fileId="16"/>
      <Texture fileId="20"/>
      <Normalmap fileId="21"/>
      <Glossmap fileId="22"/>
    </Material>
2.20 And as usual…Change the value of colorScale to 0.018 0.017 0.017.
2.21 Scroll down to line 670, where it says:
<Material name="quadtrac715_CASEIH_BLACK_mat" materialId="42" customShaderId="13">
      <CustomParameter name="clearCoatIntensity" value="0.1000"/>
      <CustomParameter name="clearCoatSmoothness" value="0.2000"/>
      <CustomParameter name="colorScale" value="0.0077 0.0100 0.0149"/>
      <CustomParameter name="smoothnessScale" value="0.8500"/>
      <Custommap name="detailDiffuse" fileId="14"/>
      <Custommap name="detailNormal" fileId="15"/>
      <Custommap name="detailSpecular" fileId="16"/>
      <Texture fileId="20"/>
      <Normalmap fileId="21"/>
      <Glossmap fileId="22"/>
    </Material>
2.22 Change the value of colorScale to 0.018 0.017 0.017.
2.23 Scroll down to line 703 (this is the last one we will edit), where it says:
 <Material name="quadtrac715_calibratedGlossPaint_mat" materialId="26" customShaderId="13">
      <CustomParameter name="clearCoatIntensity" value="0.5000"/>
      <CustomParameter name="clearCoatSmoothness" value="0.8500"/>
      <CustomParameter name="colorScale" value="0.012 0.012 0.012"/>
      <CustomParameter name="smoothnessScale" value="0.8500"/>
      <Custommap name="detailDiffuse" fileId="14"/>
      <Custommap name="detailNormal" fileId="15"/>
      <Custommap name="detailSpecular" fileId="16"/>
      <Texture fileId="20"/>
      <Normalmap fileId="21"/>
      <Glossmap fileId="22"/>
    </Material>
  </Materials>
2.24 Change the value of colorScale to 0.018 0.017 0.017. Now you can hit the Save button in NotePad Plus (the button with just one floppy disk icon).
Step 3 – Visual Inspection
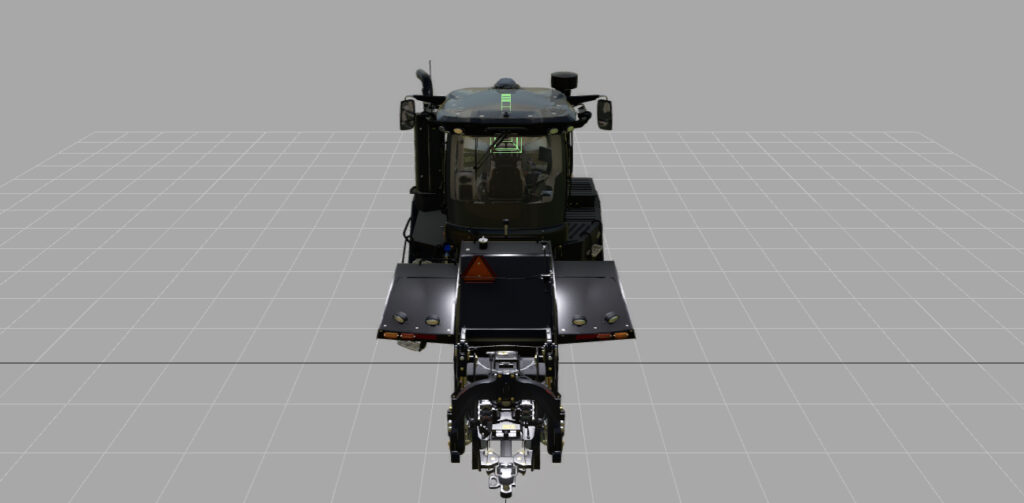
We are now ready to view the changes we made. Go back to the quadtrac215 folder window and click directly on the quadtrac715.i3d to open it up in GIANTS Editor. The editor will start, and you’ll see something like this:

Now, I’ve hidden these yellow circles that are spread around the vehicle. You can also do this by right-clicking into the viewport and choosing Show -> Lights to hide these. These are just visual references and aren’t shown inside the Farming Simulator when you run the game.
So there you go. The 0.018 0.017 0.017 represents a somewhat black color, and we have added this color to most of the exterior surfaces as well as the driver’s seat inside the cabin.
If you hold down the right mouse button and use the WASD-keys on your keybaord at the same time, you’ll be able to navigate in 3D-space around the vehicle.
Step 4 – Buying CASE IH Steiger 715 Quadtrack inside Farming Simulator 25
Run the game and buy the vehicle from the store. If you don’t have the money, then take a loan or use a mod like PowerTools.
So, to revert to the default skin, you may copy quadtrac715.i3d and save it somewhere else, like in a folder named My FS25 Mods or any other folder with a subfolder named quadtrac215black, for example.
Then, you head back to the vehicle folder inside the game’s main folder and replace the i3D file with the original.
