
The vital part of this video starts at 0:20 provided by Blender Academy on YouTube.
The elements/components of geometry
Let’s start by creating a new Blender scene. To do this, click File > New > General from the main menu, located to the right of the Blender logo.
In this ‘new scene’, we have the default/general scene, which includes the cube, camera, and light, also displayed in the Outliner Panel (located on the upper right side of the viewport).
Let’s zoom in on the cube a little bit using the scroll wheel on our mouse. Three main components shape this cube that we cannot see yet. Anyway, I’m going to list these now:
- A vertex at the corners of the cube.
- An edge line between two vertex points.
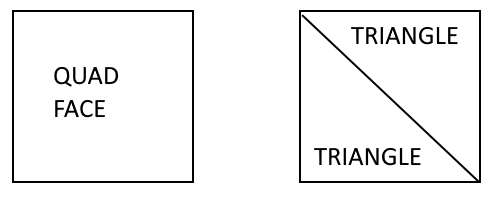
- A face/surface of the cube, that is connected to 4 edge lines and 4 vertex points, hereby referred to as vertices.
One surface of the cube consists of four vertices, four edges, and one face. That face itself holds a diagonal edge line that we cannot see in Blender. However, we can see this in the statistics for the selected object, our cube.
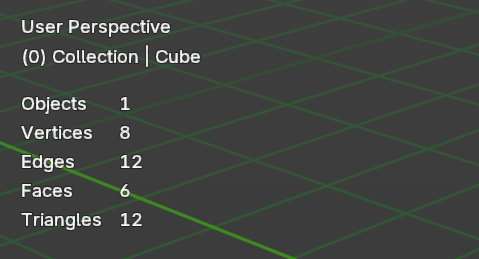
That’s the total statistics of components inside the cube, where the cube is considered a single object, holding eight vertices, 12 edges, six faces, and 12 triangles. The triangle is a triangular face within a quad face (four-sided). That means the quad is divided into two triangular faces. Why is this important?
When a Blender scene or our 3D space becomes occupied by several 3D meshes or objects, as we start adding stuff, it will gradually affect the performance inside Blender, and our computer will have to work harder.
Later on, we will manipulate these components, which is known as 3D modelling.