
The video starts at 0:17, provided by Blender Academy on YouTube.
As usual, we start this lesson by creating a new Blender scene by clicking File > New > General in Blender.
We now have our default cube. In this lesson, we will utilise the properties of an object in Blender and make adjustments to these properties. So, we want to head over to the Properties panel, located on the right side of the viewport, below the Outliner panel.
If we hover the mouse cursor over the small buttons on the left side of this panel, we’ll see the names of each panel. You can continue hovering over these until you find the panel labeled ‘Object’, which is represented by an orange, square-shaped symbol. At the top of this panel, it says ‘Cube’, which is our selected cube. The Transform section of this panel should be open by default. If it’s collapsed, we can just click on it to open it up.
So what can we do with this panel?
We can use this panel to transform the cube by adjusting some values inside the panel, rather than using hotkeys. However, it’s important to note that hotkeys in Blender are incredibly efficient, empowering you to work more quickly and effectively. For now, we will stick to this panel and follow the teacher’s lead.
We know from other lessons that the little panel in the bottom-left corner is displayed when we transform an object inside the viewport. That panel tends to auto-close or lose its properties when we deselect the object or move to the next operation. Therefore, the Object Panel serves as our backup in case we need to make adjustments we forgot when transforming an object.
To use this panel, type 1 (one) and press ENTER where it says ‘Location X’. This will move the cube one meter in the positive X-direction. Or in other words, along the red X-axis inside the viewport.
Next, we can rotate the cube by typing 45 into the field that says ‘Rotation X’. This will rotate the cube 45 degrees around the X-axis.
We can also change the scale in the X-direction by typing ‘2’ (two) into the ‘Scale X’ field. This will scale the cube to twice its size.
If we want to see more information about our selected object in Blender, we can press N on the keyboard (if we are in Object Mode), and a new panel to the right in the viewport will open up.
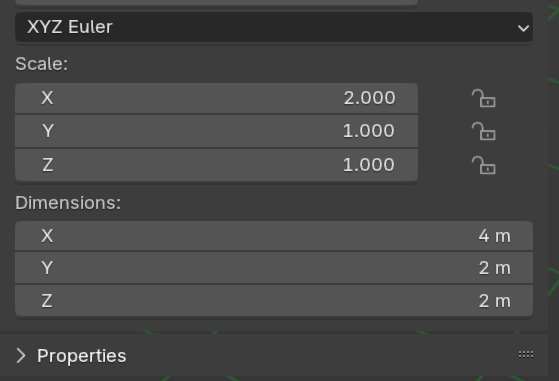
This panel now has an open tab labeled ‘Item’, and we can also view information about the object’s location, rotation, and scale, as well as change values within this panel. The additional information we find in this panel is the Dimensions, which can be helpful when working with specific dimensions (width, length, and height) within a Blender scene. However, instead, the dimensions are listed as XYZ dimensions, along with the corresponding metrical unit (m).
This panel can also serve as a backup in case we need to perform transformations in our scene later on.
To close this panel, you can press N on your keyboard again with your cursor inside the viewport.
Applying transformations (freeze transformations)
To apply the transformations, press Ctrl + A to open the Apply Menu. Within this menu, we can apply each transformation, such as move, rotate and scale, or even apply all transformations.
Let’s choose Apply All Transformations for now, and inside the panel we opened up with the N key, we’ll see that the location is set back to 0 (zero) meters, the scale is set back to 1 (one), and the rotation is set back to 0 (zero) degrees.
So, if we had an object with some rotation to it, we froze that rotation, making the rotation now a part of the cube’s object data. It essentially involves baking transformations into an object, instructing Blender to store these transformations within it.
Note! After applying these transformations, we cannot reset them by using the hotkeys ALT + G (move), ALT + R (rotate), and ALT + S (scale). You will find sources on the web that claim you can, but those sources aren’t entirely accurate. We can do this by undoing (Ctrl + Z) if necessary. If not, then we may even have to delete the object and create a new one.
Anyway, we still have the panels mentioned earlier, where we can also make adjustments to correct the applied transformations, and then use the new transformations to apply these instead.
This feature is primarily used when applying modifiers to an object in Blender.